Bloggity Blob Blog
This is web log note. It’s the first here. Trying this thing out.
Be yourself; Everyone else is already taken.
— Oscar Wilde.
This is web log note. It’s the first here. Trying this thing out.
Be yourself; Everyone else is already taken.
— Oscar Wilde.
Yesterday’s visit to the store started to go super-detour when we were on our way to the toy aisle. Passing by the fishing & outdoor aisle, the boys spotted the little bait fridge.
Queue Jack Skellington’s, “What’s this!?!”
Short version: We bought a worm farm!!!

Currently we have the bedding soaking up some lake water. Planning to add the worms this evening. Looking forward to farming some Red Worms!
I’m not sure of the image source, I grabbed it from a web search result. Contact me if credit or removal required.
One of the benefits of Xbox & Xbox360 is LAN party gaming. I have multiple Xbox360 consoles and one original Xbox console. I wanted to get them connected for some classic network play. My router is not near the main play area. One of my 360 consoles has the Xbox WiFi adapter and connects to Live with no issues. Another 360 needs a connection and the official WiFi adapters are not affordable recently. I had an older WiFi router running Tomato firmware. I used it to create a wireless link to the internet connected main WiFi router.
The 360 console connects to the Tomato with a network cable to the router’s local LAN. The Tomato then uses Wireless Ethernet Bridge mode to connect to the main router. The main router handles DHCP for the 360 console. All consoles can connect to Xbox Live and each other for local LAN play in games that support it. Instructions from here were used to set up the Wireless Ethernet Bridge on the Tomato firmware router.
Several original Xbox LAN play games play on and with Xbox 360 consoles. Game titles such as ‘Crimson Skies: High Road to Revenge’, ‘Star Wars Battlefront II’, ‘Tom Clancy’s Splinter Cell: Chaos Theory’, & ‘Halo 2’ support group and/or co-op network play. Game list from here.
Links:
“https://www.thegamer.com/xbox-multiplayer-games-lan-party/“
“https://www.spideylab.com/tomato-router-wireless-repeater-ethernet-bridge-mode/“
The 16-bit and other generation game titles still hold my attention. Installing RetroArch on a Fire HD tablet allows classic gaming in a mobile style.
Installing RetroArch takes a little extra work, it must be side-loaded via SD memory card for the Fire HD tablet. Once installed & setup, it’s available from the home screen of the tablet. The menu has multiple options for the display. At the time of my setup, the ribbon and bar style similar to PlayStation3 navigation was the default. More information can be found on the web & at RetroArch.com.
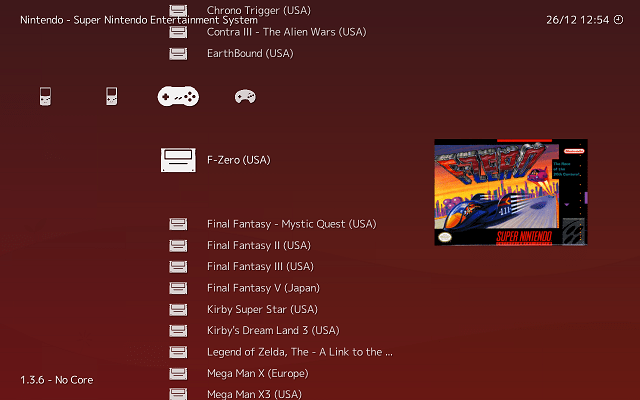
The software allows for emulation cores to be used. The game (ROM) files required must be obtained separately. It is taken that you own the original game cartridges on their original platform. I do own physical copies of F-Zero (SNES) and Pokemon LeafGreen (GBA) shown in my examples.
The emulation for Sega Genesis, Nintendo GameBoy, GameBoy Color, GameBoy Advance, and Super Nintendo perform well on the tablet. Adding a Bluetooth SNES-style controller to the mix completes the trip down memory lane.
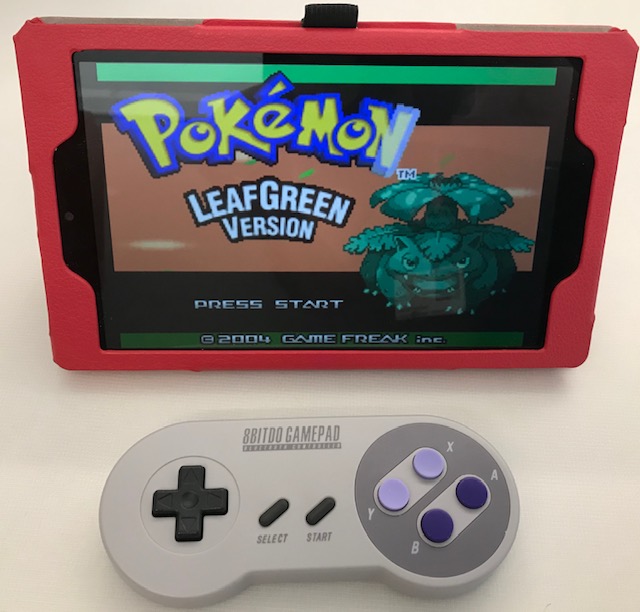
This is the older model SN30 from 8BitDo (link to a newer model). I am not an expert, but I cannot discern any lag in game play with direction or button input. The battery has lasted well for up-to-roughly-two-hour play sessions so far. The controller recharges on the included micro-USB cable. Bluetooth pairing has been straight forward with multiple devices.
Overall, this is a great mobile classic gaming setup.
Writing this late on Christmas Day 2019. One of my gifts is an HDMI converter & upscaler for Composite/S-Video. So far, it does what it claims.

The Nintendo 64 is one of my favorite game consoles. This one is named MOGU. It was previously used as the Mobile Office Gaming Unit. It was wheeled out on an A/V cart during lunch hours and many a laugh were had.
The lack of analog input in modern displays and televisions leaves the older consoles like the N64 stored in closets. This HDMI converter for Composite (Yellow) or S-Video (that odd cable with multiple pins that most people never used) allows one to select the input and select the output resolution.

This thing does what it says it does. Initial setup and testing is positive.
At the time purchased, this is about $35 on Amazon. The product title is “Tendak 3RCA AV CVBS Composite & S-Video R/L Audio to HDMI Converter Adapter Support 720P/1080P with 3RCA S-Video Cable for NES SNES N64 PS2 PS3 HDTV.”
This guide is is created to help put together an AR-15 lower receiver from a stripped receiver and a lower receiver parts kit. This page content and pictures were copied from AR15.COM website April 2015. Created by webmaster@ar15.com.
Some new images added December 2019 by Stan.

There are a few tools that make it easier to put together these kits, but none of them are necessary. Minimum requirements include a hammer and punch to drive in a couple of roll pins, a flat-blade screwdriver for A2 stock screw, and either a screwdriver or Allen key for the pistol grip screw. Specialized tools are available from Brownells, at 515-623-4000.
The lower receiver parts kit consists of 30 parts not counting the stock assembly, the receiver, or the pistol grip. It is a good idea to lay all your parts out on a flat, light-colored surface so that you can verify all your parts are there, and find them easily when you need them.
Most parts kits come covered in oil to prevent rust; wipe all the excess oil off before assembly. Because of tight tolerances, some of these parts will be a tight fit. With the exception of the roll pins, no part should need to be hammered into place.
The steps for assembly are presented in a sequence which has been effective. It is by no means the only correct method, as it does not make any difference on the end result if the magazine catch is installed before or after the bolt catch for instance. It is important to install the selector before the pistol grip, and a few other steps that must be performed before others. Unless you are experienced, follow the sequence presented and you will be successful.
Always work in a well-lit area, and it is helpful to work on a flat, hard surface. There are many small pins and springs, and they have a tendency to roll or fly away and disappear forever… In addition, look over the lower receiver before you begin the assembly. Many of the small holes can have debris in them from the forging process; a small drill bit, turned by hand, will clean these out nicely.
MAGAZINE CATCH ASSEMBLY

PARTS: magazine catch, magazine catch spring, magazine button
TOOLS: 5/32″ roll pin punch
TRIGGER GUARD ASSEMBLY
PARTS: trigger guard assembly, roll pin
TOOLS: 1/8″ roll pin punch, hammer
BOLT CATCH ASSEMBLY
PARTS: bolt catch, bolt catch buffer, bolt catch spring, roll pin
TOOLS: 3/32″ roll pin punch, 5/32″ (or larger) punch
PIVOT PIN ASSEMBLY

PARTS: pivot pin, pivot pin detent, pivot pin detent spring
TOOLS: pivot pin installation tool, 3/32″ drive pin punch
TRIGGER ASSEMBLY

PARTS: Trigger, Trigger Pin, Trigger Spring, Disconnector, Disconnector Spring
TOOLS: 5/32″ drive pin punch
HAMMER ASSEMBLY

PARTS: hammer (with J-pin installed), hammer spring, hammer retaining pin
TOOLS: 5/32″ drive pin punch
SELECTOR ASSEMBLY

PARTS: safety selector
TOOLS:
PISTOL GRIP ASSEMBLY

PARTS: selector detent, selector detent spring, pistol grip, pistol grip screw, lock washer
TOOLS: Allen key or flat-blade screwdriver (depends on your screw type)
A2 STOCK

PARTS: takedown pin, takedown pin spring, takedown pin detent, stock, buffer extension, retainer, retainer spring, buffer, buffer spring
TOOLS: #10 (or larger) flat-blade screwdriver
TELESCOPING STOCK

PARTS: takedown pin, takedown pin spring, takedown pin detent, telescoping stock, buffer extension, backplate, locking ring, retainer, retainer spring, buffer spring, buffer
TOOLS: Telescoping Stock Wrench
